User Case: How Do I Fix Error 2009 on My iPhone
“I got the XR 2 months ago, and one day, when I woke up, it was stuck on restore mode, and I can't get it off. I’ve tried everything I can think of. It won't come off with iTunes either; it says error 2009. I don't know what it means or if I should send it in, but I don't want to lose my data or anything.” - A Post from Apple Community
What Does It Mean by iPhone Could Not Restore Error 2009
What is error code 2009 on Apple devices? Basically, when you update or restore your iPhone, iPad, or iPod via iTunes, it is easy to encounter an issue that reads, "The iPhone 'iPhone could not be restored. An unknown error occurred (2009). " It is also called iTunes error 2009. Why do I keep getting an error when trying to restore my iPhone? You might wonder. Frankly speaking, the USB connection failure should be responsible for this.
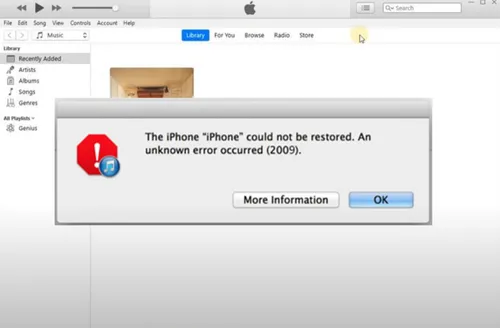
Also, many other culprits can result in this problem, such as iTunes system errors, antivirus program interference, etc. No matter what the reason is, we will provide you with 6 simple and reliable solutions to handle this issue. If you happen to need this, keep reading.
How to Fix iPhone Could Not Restore Error 2009
In this section, 6 easy and simple solutions are provided. Check below to learn more.
Way 1: Use an Official USB Cable
It’s important to use an authentic USB cable from Apple. Copycats are similar to the official ones on the surface. However, they are different in material and utility. So, when faced with the error 2009 issue, you should check the USB connection first. Then, you can try an official USB cable.
Or, try a different port on your computer (not an attached keyboard or USB hub). Likewise, trying a different computer is also helpful.
Way 2: Restart the Computer or iPhone
Sometimes, there may be a device glitch or a stuck, leading to the iPhone could not be restored error 2009 issue. The easiest and simplest way to handle this is to restart your computer or iPhone. Turn off your computer and iPhone, and then turn them on. You can try again to see whether this problem pops up again.
Way 3: Update iTunes
Check whether your iTunes is the latest version. If not, you should update it since the newest version always fixes errors and bugs.
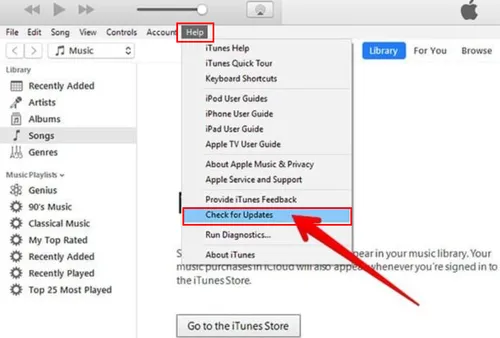
If you are using iTunes on Windows, follow the steps below:
Step 1: Launch your iTunes > Help at the top > Check for Updates.
Step 2: Follow the on-screen tips to continue.
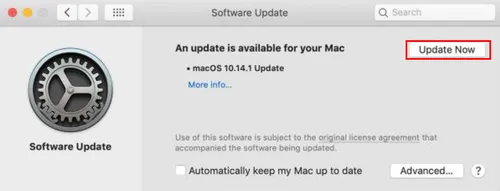
If you are using iTunes on a Mac, check the steps below:
Step 1: Open iTunes and go to System References.
Step 2: Click on Software Update. If there is an update available, hit the Update Now tab.
Note: If you are using the latest version of iTunes, try reinstalling the app. Then try again to see whether you still encounter the iPhone could not restore error 2009.
Way 4: Disable iTunes Helper
If you still find the issue, you can disable iTunes Helper to see whether it is helpful. Please follow the steps below:
Step 1: Hit the Apple icon > System Preferences > Users & Groups.
Step 2: Tap your username on the left side, then click on Login Items. Select iTunesHelper and tap the minus icon. This means that you disable the feature.
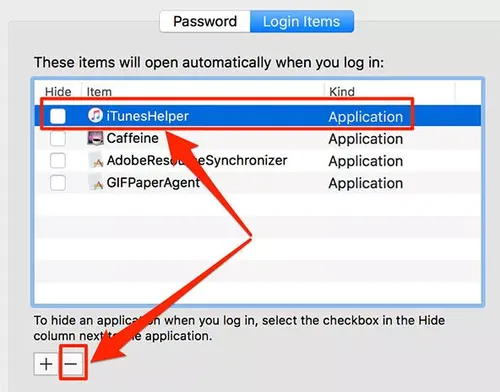
Step 3: Now, you can try again to see whether the iPhone could not restore error 2009 disappears.
Way 5: Update iTunes
An antivirus program may sometimes cause the 2009 error. So, you can check if there is an update to your antivirus protection program. If there is an update, make sure that you click on it and try to restore/update your iOS via iTunes. The error 2009 might be fixed.
Way 6: Contact Apple Support Team
If you have tried all the methods above and still encounter the iPhone could not restore error 2009 issue, the last but always most useful method is to get in touch with the Apple Support Team. By describing your questions and issues, they will offer you help as soon as possible.
Fix “iPhone Could Not Restore Error 2009” with Gbyte Recovery
Running into the “iPhone could not restore error 2009” while restoring iOS data can be frustrating. But instead of struggling with iTunes, you can turn to Gbyte Recovery—a professional iOS data recovery tool designed to restore all types of iOS data quickly and effortlessly, even if it’s already deleted.
What can you recover?
Messages, photos & videos, Safari & Safari History, calls, emails, Calendar, Reminders, WhatsApp, WhatsApp Business, Kik, FaceTime, Line, Instagram, and more.
Why Gbyte Recovery stands out:
Fast Deep-Scan: Thoroughly scans all your devices and uncovers lost data.
Easy Recovery in Few Steps: No tech skills required—restore selected data quickly.
Selective Recovery: Choose exactly what you want to recover instead of everything.
Safe & Non-Overwriting: Your current data stays intact—unlike iCloud backups.
Then, let’s figure out how to avoid iPhone could not restore error 2009 via this iPhone data recovery service:
How to recover data and avoid Error 2009:
Download Gbyte Recovery for free on your computer.
Choose Data Types: Select what you want to restore, e.g., Messages, then tap Scan.
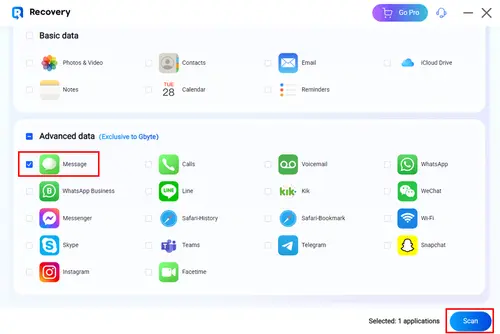
Preview & Select: Choose the messages or data you want to recover.
Recover to PC: Click Recover to PC, and your selected data will be saved in a folder named after your iCloud account.
With Gbyte Recovery, fixing iPhone restore errors and getting your important data back is fast, safe, and stress-free.
In the End
That’s all about how to fix the iPhone could not restore error 2009 issue. Anyway, you can use the 6 simple methods to handle this problem. If they are not helpful, you can restore data by using Gbyte Recovery. This way, you can avoid the issue effortlessly. This reliable service provides a free trial. So, why not have a try? It can help you restore deleted and disappeared data with ease. Start now and enjoy getting your data back.
