Whether you're running out of storage or just want a fresh start, deleting multiple photos even all the photos on your iPhone can free up a surprising amount of space. But with photos stored in various albums, synced via iCloud, and hidden in unexpected places, a simple "Select All and Delete" often isn't enough. In this guide, we will show you some reliable methods to delete all photos from your iPhone permanently.
How to Delete All Photos from iPhone Using the Photos App
Step 1: Open the Photos app and Tab "All" and "Select" in the top right corner.
Step 2: Drag your finger across the screen and select all the photos. Tab the trash icon and confirm to delete all items.
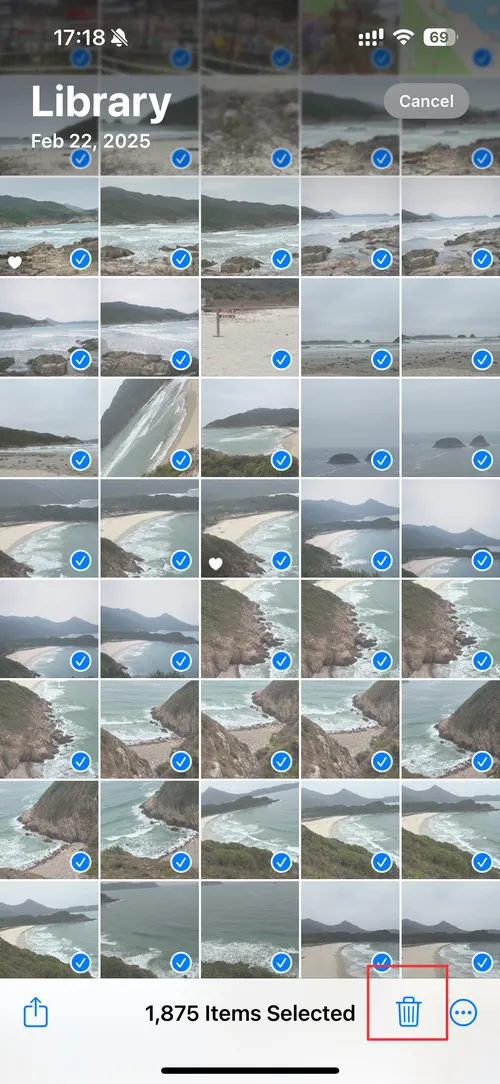
But that’s not all. Your photos aren’t fully gone yet—they’re now in the “Recently Deleted” album and still taking up space.
Step 3: Go to Albums > Recently Deleted.
Step 4: Tap “Select” > “Delete All” to permanently erase them.
This two-step process ensures your iPhone no longer retains deleted photos in temporary storage.
How to Delete All Photos from iPhone via iCloud
If your photos are synced with iCloud, deleting them on your iPhone will also remove them from iCloud and other connected devices. Here’s how to handle this safely:
Step 1: Go to Settings > [Your Name] > iCloud > Photos.
Step 2: Make sure “iCloud Photos” is turned on.
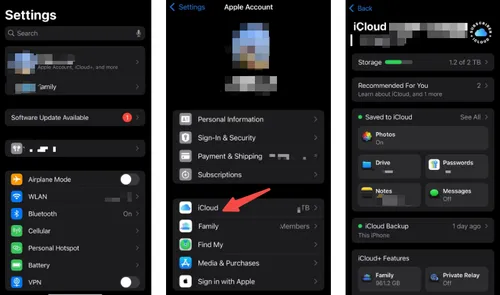
Step 3: Open the Photos app and delete all images as shown in the previous section.
Step 4: Visit iCloud.com on a browser, log in, and go to Photos > Recently Deleted > Delete All.
If you want to delete photos only from your iPhone but keep them in iCloud, first disable iCloud Photo syncing (Settings > [Your Name] > iCloud > Photos > Turn off iCloud Photos). This will stop sync and give you the option to delete local copies only.
How to Delete All Photos from iPhone Using a Mac or PC
If you're dealing with thousands of images and want more control, using your computer might be faster.
🔹 On Mac:
Step 1: Connect your iPhone via USB.
Step 2: Open the “Image Capture” app.
Step 3: Select your iPhone in the sidebar.
Step 4: Select all photos (Cmd + A), then click the trash icon.
🔹 On Windows PC:
Step 1: Connect your iPhone and choose “Trust This Computer.”
Step 2: Open File Explorer > This PC > [Your iPhone].
Step 3: Navigate to Internal Storage > DCIM.
Step 4: Select all image folders and delete the contents.
This method is especially useful if you have large photo libraries and want faster deletion without touching your phone.
How to Permanently Delete Hidden Photos and Albums
Sometimes, even after deleting all visible images, space remains occupied due to hidden or synced albums. Here’s how to clean those up:
Step 1: Go to Photos > Albums.
Step 2: Scroll down and check “Hidden” under Utilities.
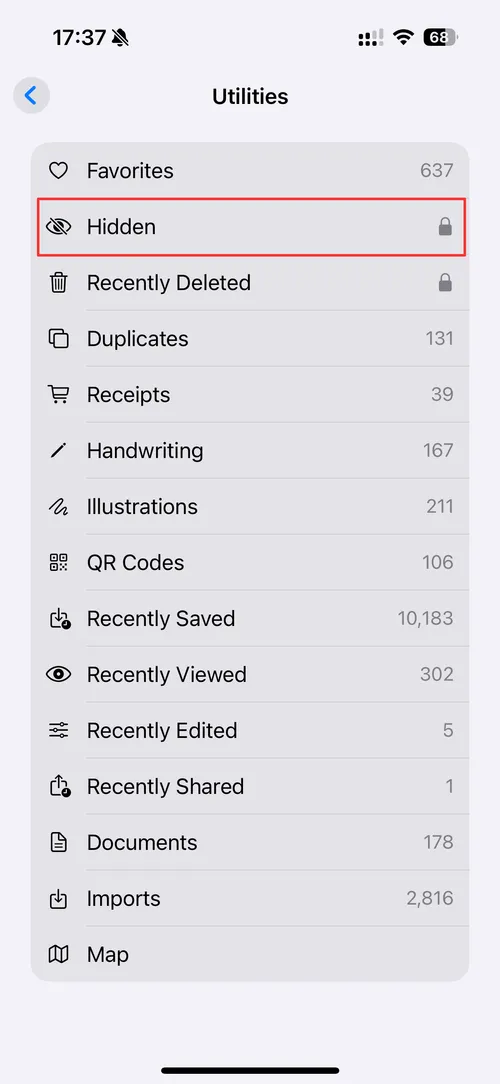
Step 3: Open it, tap “Select” > “Delete All.”
Also check “Live Photos”, “Screenshots”, “Selfies”, “Videos”. Repeat the delete process for each album to make sure nothing’s left behind.
How to Delete All Photos from iPhone Using Third-Party Apps
Third-party photo management tools can simplify mass deletion. Apps like Gemini Photos or CleanMyPhone scan your photo library, detect duplicates, blurry shots, and screenshots, and allow you to remove everything efficiently. Always verify the app is trusted and well-reviewed before granting it access to your photos.
How to Recover Accidentally Deleted Photos Using Gbyte Recovery
Oops—deleted the wrong photo or cleared your library too quickly? Don’t panic. With Gbyte Recovery, you can restore permanently deleted photos from your iPhone, even after emptying the Recently Deleted folder.
Here’s how it works:
Step 1: Download and install Gbyte Recovery on your PC.
Step 2: Sign in with your Apple Account.

Step 3: Select the "Photos" and scan your device for lost photos.

Step 4: Preview and select the files you want to recover, then click “Recover to PC.”

Gbyte Recovery uses advanced scanning to retrieve even deeply buried photo files—especially useful if your iPhone wasn't backed up recently.
Final Thoughts
Knowing how to delete all photos from your iPhone helps keep your storage clean and your device running smoothly. Whether you use the built-in Photos app, iCloud, a computer, or a third-party app, each method has its benefits. And in case you need to undo a mistake, Gbyte Recovery offers a reliable way to get your photos back—even the ones you thought were gone forever.
