Gbyte Recovery
Free scan and selective preview of 25+ data types like messages, photos, and WhatsApp. No data overwritten — recover only what you need.
Table of contents
It always happens when you least expect it.
You’re finishing up a report on your Mac, cleaning out old files to make space, and—without thinking—you empty the Trash. Minutes later, panic hits. The Word document you needed for tomorrow’s meeting is gone. Or maybe it was family photos, an important PDF, or even a presentation you’ve been working on for weeks.
Literally, deleted doesn’t always mean lost forever. macOS has multiple recovery layers built in, and even when those fail, proven methods exist to retrieve erased files. This guide will walk you step by step through how to recover deleted files on Mac—from simple Undo commands to advanced recovery tools.
Before diving into detailed steps, here’s a quick overview of the most effective ways to recover deleted files on your Mac:
Undo (Command + Z) for immediate mistakes.
Trash or iCloud Drive for easy restores.
Time Machine if backups are available.
iPhone file recovery software for permanently deleted files.
Sometimes the fastest solution is also the simplest. macOS allows you to undo the last action in Finder.
When to use this method:
If you just deleted a file seconds ago—say you accidentally dragged a folder into the Trash while reorganizing your desktop—you can often bring it back instantly.
Steps:
Stay in the Finder window where you deleted the file.
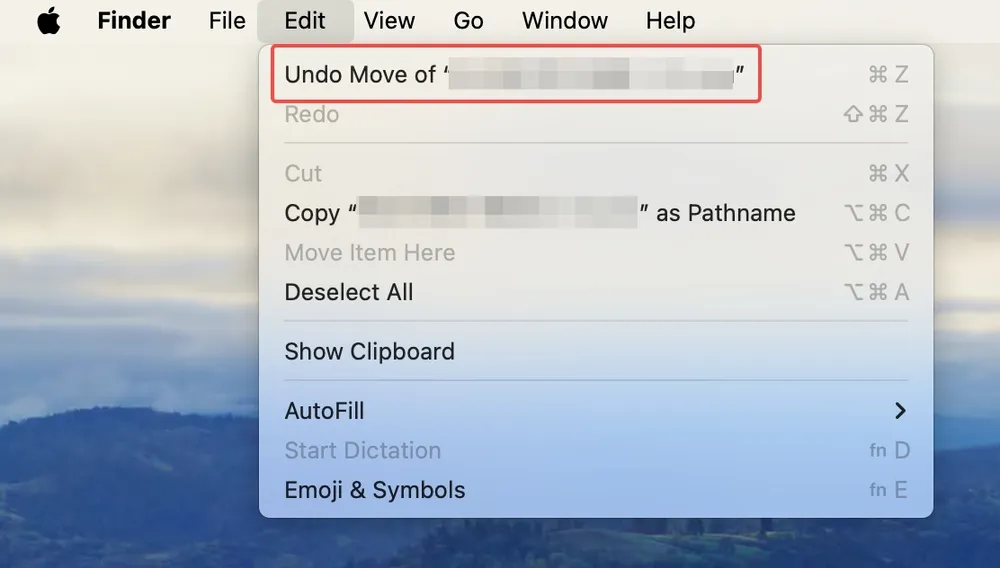
Press Command + Z (or go to Edit → Undo Move).
The deleted file will immediately return to its original location.

👉 This is the quickest way to recover erased files on Mac, but it only works right after deletion.
The Trash folder is your first line of defense. Think of it as a temporary storage for discarded files, giving you a chance to change your mind.
When to use this method:
Perfect if you deleted something recently but haven’t emptied the Trash yet—maybe you removed a batch of downloads but later realized an important invoice was inside.
Steps:
Open the Trash from your Dock.
Browse or search for the deleted file.
Right-click the file and select Put Back.

👉 If you’re wondering how to retrieve deleted files from Trash on Mac after emptying it, keep reading.
Time Machine is Apple’s built-in backup system, designed for exactly these moments. It creates hourly, daily, and weekly snapshots of your Mac’s files.
When to use this method:
Best for users who had Time Machine set up before deletion. For example, if you deleted a Word file weeks ago and realized today that you still need it, you can travel back in time and restore it.
Steps:
Connect your Time Machine backup drive.
Open the folder where the file was originally stored.
Launch Time Machine from the menu bar.

Scroll through the timeline to find the file.
Click Restore to bring it back.
👉 One of the best answers to how to restore permanently deleted files Mac—but only works if you had backups enabled.
Not everyone uses Time Machine or keeps regular backups. If you’ve emptied the Trash or deleted files without a backup, all hope isn’t lost—macOS doesn’t immediately erase the underlying data. That’s where data recovery software can help.
When to use this method:
You’ve permanently deleted files and don’t have a Time Machine backup.
You need to recover important documents, PDFs, images, or folders that were accidentally removed.
Tools like Disk Drill can scan your Mac and recover permanently deleted files. The free version lets you restore up to 500MB, while the PRO version handles larger recoveries. Keep in mind that very large or fragmented files may be harder to retrieve.
If you’ve tried Disk Drill on your Mac but still can’t find some important files, there’s a good chance they’re on your iPhone—especially if your Mac and iPhone share the same iCloud account. In this case, recovering directly from your iPhone can be the most effective solution.
Gbyte Recovery is a professional tool that supports recovering over 20 types of data, including Files app documents, WhatsApp messages, notes, photos, and more. The software also allows free scanning to preview recoverable files and ensures selective recovery without overwriting existing documents or needing a factory reset. This makes it a safe and reliable option for retrieving important iPhone data that seems lost forever.
👉Need to get back lost data? Learn how to recover permanently deleted files on your iPhone in just a few easy steps.
If you use iCloud Drive, your deleted files may still be recoverable from Apple’s servers—even if they’re gone from your Mac.
When to use this method:
Helpful if you work across devices (Mac, iPhone, iPad) and store documents in iCloud.
Steps:
Go to iCloud.com and sign in.
Click Drive → Recently Deleted.
Select your file and click Recover.

👉 Great solution if you’re asking how to retrieve files from emptied Trash on Mac.
Word documents are some of the most frequently lost files, especially due to app crashes or accidental closure without saving.
When to use this method:
If Microsoft Word quit unexpectedly or you closed a file without saving, you may still be able to retrieve an AutoRecovered version.
Methods:
AutoRecover: Open Finder → Go to ~/Library/Containers/com.microsoft.Word/Data/Library/Preferences/AutoRecovery/
Temporary Folder: Open Terminal → type open $TMPDIR → Check TemporaryItems.
👉 These steps are the most practical if you specifically need how to recover deleted Word files on Mac.
Gbyte Recovery
Don't wait until your data is gone forever! Try Gbyte iOS Recovery for free—scan first!
100% secure. Your data always stays private.
Share


Related articles
The installation wizard will automatically start after downloading.
After registration, the recovery process can be managed through the web interface.
You get it all with your purchase - no locked features, no hidden limitations.